Dead By Daylight Ranks Explained
If you've been diving into Dead by Daylight, you know the struggle of ranking up as a killer. Fear not – we're here to break down the mechanics, spill the secrets, and guide you through the process of climbing those ranks effectively.
How the DBD Grade System Works
The DBD grading system has undergone some changes, ditching the old color-coded ranks for a more skill-focused approach with the Matchmaking Rating (MMR) system. This shift means that your opponents are now chosen based on your skills rather than a simple rank number. Every 13th of the month, everyone gets a fresh start at Ash 4(previously Rank 20).
A significant advantage is that, with the demise of the traditional rank system, losing a rank you've earned is a thing of the past. Once you've achieved a grade, it sticks with you, irrespective of in-game performance. So, even if you're having a rough day as a killer, no need to worry about losing your hard-earned progress.
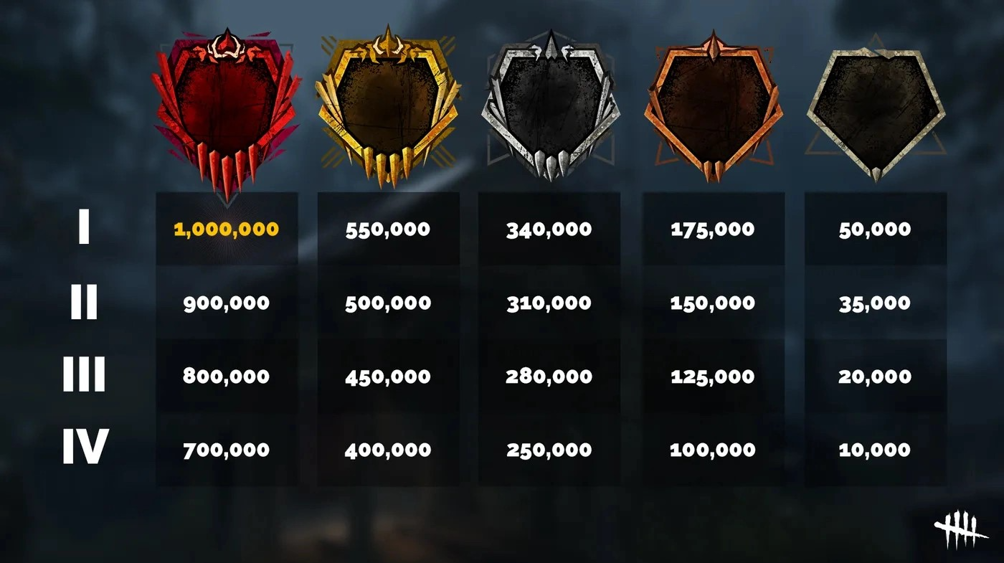
All DBD Ranks In Order
Ash
- Ash I
- Ash II
- Ash III
- Ash IV
Bronze
- Bronze I
- Bronze II
- Bronze III
- Bronze IV
Silver
- Silver I
- Silver II
- Silver III
- Silver IV
Gold
- Gold I
- Gold II
- Gold III
- Gold IV
Iridescent
- Iridescent I
- Iridescent II
- Iridescent III
- Iridescent IV
- Iridescent V
The 4 Categories in DBD
Gatekeeper
In this category, the goal is to dominate the early game. Points are earned for unrepaired generators during the first nine minutes of the match. Imagine it as a race against time; if you can keep survivors at a minimum of three generators for those crucial first nine minutes and ensure the exit gates stay closed, you'll be rewarded with an iridescent emblem. Don't stress about hatch escapes; they won't penalize you.
Devout
Devout is all about hooks and kills. To secure an iridescent emblem, you need a minimum of 10 points, earned by hooking all survivors at least once and sacrificing survivors. A helpful tip here is to avoid letting survivors bleed out, as you won't get any points for that. Aim for consistency in your hooks and sacrifices to climb the Devout ladder.
Malicious
The Malicious category revolves around your ability to apply pressure on survivors. You gain points for successful hits and new hook statuses. However, beware of penalties – losing a point for each time a survivor heals and another point if you lose a survivor during a chase. While it's crucial to keep these factors in mind, the key is to focus on your game and play the killer role naturally. If you aim for around 24 hits and eight hooks, you're on the right track.
Chaser
Chaser is all about speed. To grab an iridescent emblem, you need a minimum of 2,550 points. The idea here is straightforward – initiate a chase, and the faster you bring a survivor down, the more points you earn. Shorter chases mean more points, so keep it simple: locate survivors and bring them down swiftly. If you struggle with chases, there's a helpful video on how to loop effectively as a killer.
Strategies for Ranked in DBD
Understanding the emblem system is one thing, but maximizing your matches is the key to rapid ranking. Here's is my recommended perk build to help you achieve just that:
Corrupt Intervention
For early game dominance, Corrupt Intervention is your go-to perk. It blocks the three furthest generators for two minutes, allowing you to focus on managing a more manageable four generators within closer proximity. This is crucial to prevent losing a generator too early in the game.
Barbecue & Chili
Information is power, especially for a killer. Barbecue & Chili, activated after hooking a survivor, reveals the auras of other survivors outside of a 40-meter range. Not only does it guide you to your next target, but it's also an excellent way to earn blood points along the way.
Pop Goes the Weasel
Similar to Barbecue & Chili, Pop Goes the Weasel becomes active after hooking a survivor. It allows you to regress the next generator you kick by 25%. This perk remains active for 45 seconds, so use it strategically to target generators with the most progress for maximum value.
Nurse's Calling
To maintain pressure during survivor healing, Nurse's Calling is invaluable. It's an aura reading perk that reveals all survivors attempting to heal within 28 meters. This ensures you stay vigilant, preventing survivors from undoing your hard work.
This perk build may not be flashy, but it's consistent and universally effective across all killers in Dead by Daylight.
Achieving "Merciless Victory" in DBD
Now that we've broken down the emblem system and strategies let's tie it all together with the concept of "merciless victory." To double pip or be awarded with merciless victory, your emblem points need to total a minimum of 14 points, or 15 points for red grades. For instance, if you manage a perfect game with all four iridescent emblem qualities, totaling 16 points, that's a double pip for all grades.
Understanding the scoring and how to maximize your matches is the secret sauce to climbing the ranks effortlessly. By following these strategies and using the recommended perk build, you'll be well on your way to mastering the killer role in Dead by Daylight.
About the author
Just a guy passionate about web design. This hobby also includes 3D modeling, logo making and creating impressive business cards. What begun as a simple pastime, has now transformed into my main gig.


Get $55 Stake Cash for Free