FIFA 23: Top Formations & Custom Tactics for Victories

Welcome to our in-depth analysis of FIFA 23 formations, where we aim to help you discover the perfect tactical fit to dominate your opponents. With each formation offering its own unique advantages and strategies, it's essential to understand their strengths and weaknesses. Whether you aspire to conquer FUT Champions or reign supreme among your friends, this guide will equip you with the knowledge to become a FIFA tactics expert.
4-2-3-1 Narrow
The 4-2-3-1 Narrow formation combines versatile attacking options with defensive stability. The two central midfielders provide a solid base, while the attacking midfielder and wingers offer creativity and penetration. The lone striker serves as a target man or can drop deeper to link up with the attacking midfielders. This formation suits players who seek a balanced approach, capable of both solid defending and dynamic attacking.
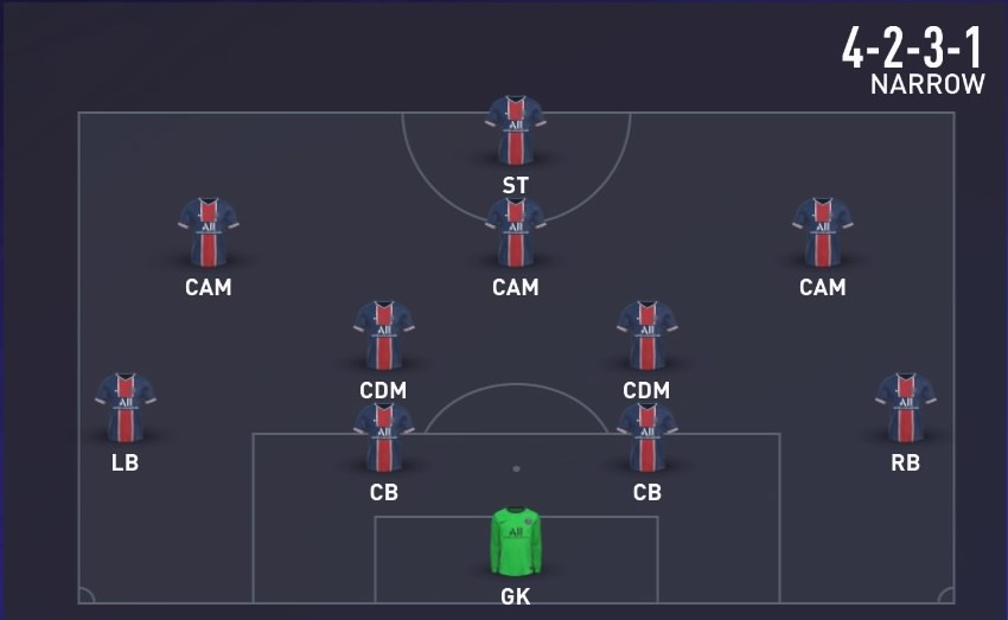
4-2-3-1 Best Custom Tactics
Player Instructions
- Central Defensive Midfielders: Stay back while attacking
- Central Attacking Midfielder: Stay forward
- Wide Attacking Midfielders: Come back on defense, stay wide
- Striker: Stay forward, get in behind the lines
Defense:
- Defensive style: Balanced
- Depth: 4 or 5 bars (slightly deeper defensive line)
- Width: 4 or 5 bars (maintain compactness)
Offense:
- Build up: Balanced or Fast build-up (depending on your preference)
- Chance creation: Default or Balanced
- Width: 5 or 6 bars (provide width for attacking play)
- Players inside the box: 4 or 5 bars (increase attacking presence)
- Corners: Default or on Balanced
- Free kicks: Default or on Balanced
Other Variations of the 4-2-3-1 Narrow
- The 4-2-3-1 Wide formation focuses on wide attacking play and defensive cover. The wingers provide width and deliver crosses into the box, while the attacking midfielder operates centrally, supporting the lone striker. The two central midfielders offer defensive cover and contribute to both attacking and defensive phases. This formation is suitable for players who thrive on wing play and rely on effective crosses to create scoring opportunities.
4-4-2 Holding (Old School)
Sometimes, sticking to the classics is the best way to go. The 4-4-2 Holding formation, a staple of soccer history, provides a balance between attack and defense. With four midfielders forming a solid line, this formation allows for effective wing play and crosses into the box. The two strikers up front ensure a strong attacking presence, making it an appealing choice for those who prefer a traditional, no-nonsense approach.
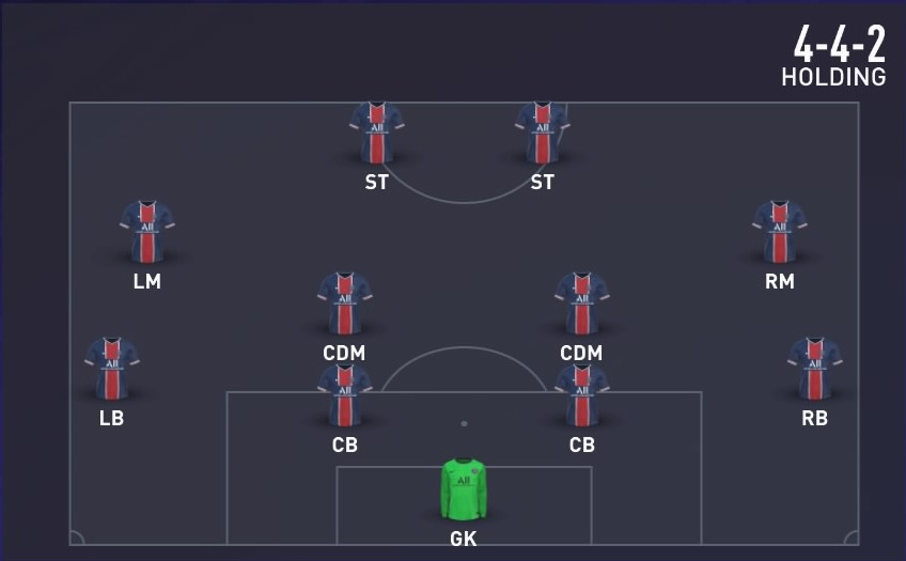
4-4-2 Best Custom Tactics
Defensive Tactics:
- Defensive Style: Balanced
- Defensive Width: 4 or 5 bars (to maintain compactness)
- Pressure on Heavy Touch: 4 or 5 bars (to apply moderate pressure)
- Depth: 5 or 6 bars (to maintain a balanced defensive line)
Offensive Tactics:
- Offensive Style: Balanced
- Width: 5 or 6 bars (to provide width and stretch the opposition)
- Players in the Box: 5 or 6 bars (to have more players in scoring positions)
- Corners and Free Kicks: 3 or 4 bars (to position players for set-piece opportunities)
Player Instructions:
- Strikers: Stay central, Get in behind (to maximize forward runs)
- Wide Midfielders: Stay wide, Get in behind (to provide width and support the attack)
- Central Midfielders: Balanced attack, Cover center (to maintain midfield presence)
- Full-backs: Balanced attack, Overlap (to provide width and join the attack when possible)
- Center-backs: Stay back while attacking, Balanced width
Other Variations of the 4-4-2
- 4-4-2 Flat: embodies a traditional two-striker partnership and wide midfielders. The midfield consists of four players, providing a balanced structure and options both centrally and wide. The two strikers work together, aiming to create space and goal-scoring opportunities. This formation is well-suited for players who appreciate a classic approach, strong link-up play between strikers, and wide midfielders who can contribute defensively and offensively.
3-1-4-2
The 3-1-4-2 formation provides a balanced approach to the game by combining defensive solidity with attacking width. With three center-backs forming a strong defensive foundation, the central defensive midfielder acts as a shield in front of the defense. The four midfielders support both the attack and defense, offering width for crosses into the box. This formation is ideal for those who want to maintain a compact defense while having sufficient options for swift counter-attacks.
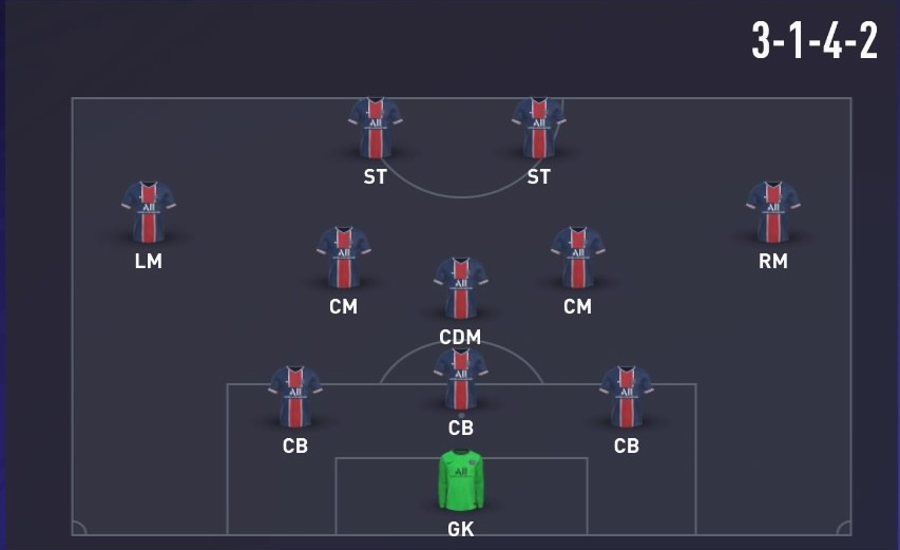
Best 3-1-4-2 Custom Tactics
Defensive Tactics:
- Defensive Style: Balanced
- Defensive Width: 4 or 5 bars (to maintain compactness)
- Pressure on Heavy Touch: 4 or 5 bars (to apply moderate pressure)
- Depth: 5 or 6 bars (to maintain a relatively high defensive line)
Offensive Tactics:
- Offensive Style: Balanced
- Width: 5 or 6 bars (to provide width and stretch the opposition)
- Players in the Box: 5 or 6 bars (to have more players in scoring positions)
- Corners and Free Kicks: 2 or 3 bars (to retain defensive solidity)
Player Instructions:
- Strikers: Stay central, Get in behind
- Attacking Midfielders: Balanced attack, Stay on the edge of the box for cross
- Wide Midfielders: Stay wide, Get in behind (to provide width)
- Central Defensive Midfielder: Stay back while attacking, Cut passing lanes
- Center-backs: Stay back while attacking, Balanced width
Variations of the 3-1-4-2
- 3-4-1-2: excels in possession-based football, focusing on keeping the ball in the center of the pitch. The double-striker partnership adds another layer of excitement to this formation. These two forwards are the dynamic duo, constantly interchanging positions, making clever runs, and providing a constant threat to any defense foolish enough to underestimate them. With the creative number 10 feeding them delicious through balls and clever flicks, they'll wreak havoc in the opponent's penalty area like a pair of goal-scoring machines.This formation is perfect for players who prefer patient build-up play, waiting for opportunities to thread penetrating through balls and unlock stubborn defenses.
- 3-4-2-1: popular choice among professional players as an attacking variant of the 3-4-1-2. It features additional strikers with a central forward and two central midfielders, designed for matches where you aim to dominate and score multiple goals. However, this formation sacrifices defensive stability, leaving you vulnerable to counter-attacks. Use it wisely, ensuring your team can maintain control of the game while being mindful of defensive transitions.
3-4-3 Diamond
With three forwards leading the line, the 3-4-3 formation is designed for teams seeking relentless attacking pressure. The wing-backs provide width and support, while the midfield duo controls the center of the pitch. In this formation, the midfielders are responsible for supporting the attack while also tracking back defensively. The limited defensive cover with only three center-backs exposes vulnerabilities, making it crucial to ensure solid midfield protection. Deploy this formation if you prioritize outscoring your opponents while accepting the risk of conceding more goals. This formation is best suited for teams with pacey and skillful attackers who can exploit spaces and create goal-scoring opportunities.
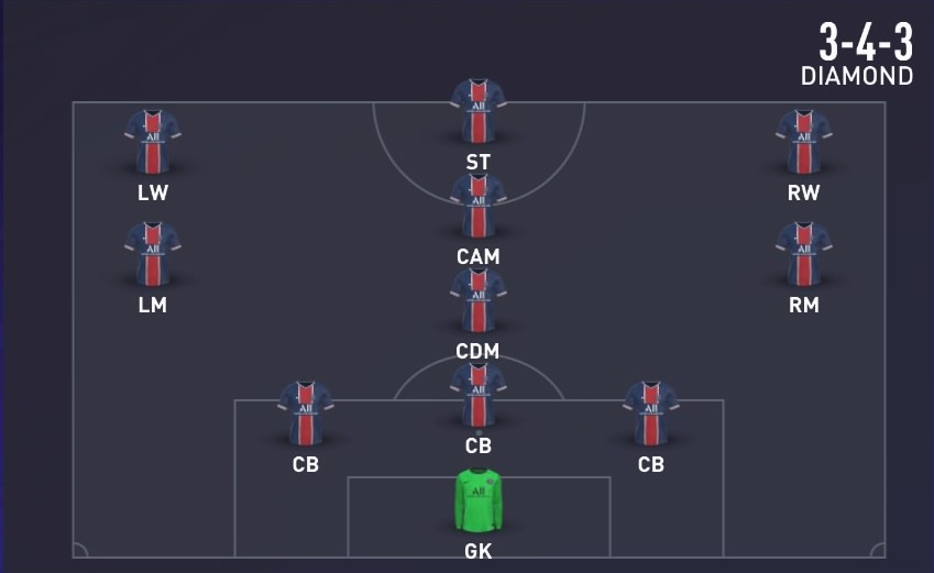
3-4-3 Custom Tactics:
Player instructions:
- Center Forward: Stay central, get in behind
- Wide Forwards: Cut inside, get in behind
- Central Midfielders: Balanced support
- Wing-backs: Join the attack, overlap
- Center-backs: Default or stay back if you want a more defensive approach
Defense:
- Defensive style: Balanced or Pressure on Heavy Touch
- Depth: 4 or 5 bars (slightly deeper defensive line)
- Width: 4 or 5 bars (maintain compactness)
Offense:
- Build up: Balanced or Possession
- Chance creation: Balanced or Possession
- Width: 5 bars (provide width through wing-backs)
- Players within the box: 5 bars (increase attacking presence)
- Corners: 3 bars (send more players into the box)
- Free kicks: 3 bars (send more players into the box)
3-4-3 Variations:
- 3-4-3 Flat: Width and Goal-Scoring Intent: The 3-4-3 Flat is tailored for players focused on offensive gameplay and goal-scoring exploits. In this formation, the midfielders are responsible for supporting the attack while also tracking back defensively. The limited defensive cover with only three center-backs exposes vulnerabilities, making it crucial to ensure solid midfield protection. Deploy this formation if you prioritize outscoring your opponents while accepting the risk of conceding more goals.
- 3-5-1-1: Crosses and Fast Counter-Attacks: The 3-5-1-1 formation is ideal for players who thrive on crossing the ball into the box or prefer fast counter-attacks. With two central forwards and an attacking midfielder, this formation creates opportunities for penetrating through balls and generates swift counter-attacking momentum. Choose this formation when looking to exploit the wings and deliver accurate crosses or initiate quick attacks through the middle.
- 3-5-2: Possession Football and Progressive Attacks: The 3-5-2 formation is a popular choice for those seeking possession-based football and progressive attacks. With two strikers up front and a midfield trio providing passing options, it offers numerical superiority in the middle of the pitch. The wing-backs provide width and can join the attack or provide defensive cover when needed. This formation allows for a controlled buildup, patient play, and effective ball circulation.
4-3-3 Attack
The 4-3-3 Attack formation focuses on high-intensity pressing and wide attacking threats. The front three players push forward aggressively, pressing the opposition's defense and creating turnovers. The two wide attacking midfielders provide width and aim to stretch the defense, while the central midfielder offers support in both attacking and defensive phases. This formation is suitable for players who thrive on relentless pressure and quick attacking transitions.
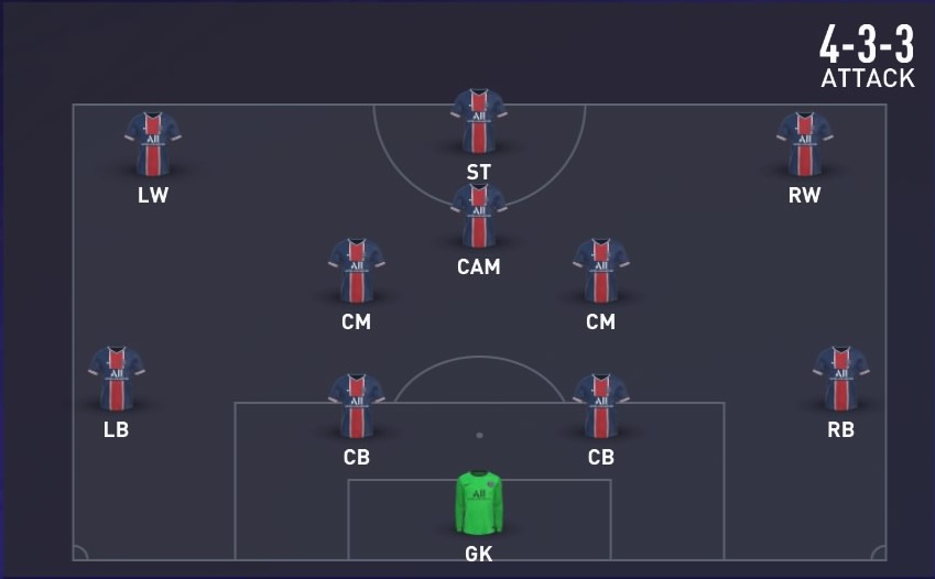
4-3-3 Best Custom Tactics and Instructions
Player instructions for 4-3-3:
- Center Forward: Stay central, target man
- Wide Forwards: Cut inside, get in behind
- Central Midfielders: Balanced support
- Full-backs: Stay back while attacking
- Center-backs: Default or stay back if you want a more defensive approach
Defense:
- Defensive style: Balanced or Pressure on Heavy Touch
- Depth: 4 or 5 bars (slightly deeper defensive line)
- Width: 5 bars (narrow defensive shape)
Offense:
- Build up: Fast build up
- Chance creation: Free Form
- Width: 5 bars (utilize wide forwards for width)
- Players within the box: 6 bars (increase attacking presence)
- Corners: 2 bars (keep more players back for defensive coverage)
- Free kicks: 2 bars (keep more players back for defensive coverage)
Additional 4-3-3 Variations
- 4-3-3 False 9: features a false striker and dynamic attacking movements. The central striker drops deep, dragging the opposition's defenders out of position and creating space for the attacking midfielders and wingers to exploit. The three central midfielders provide a solid base and contribute to both defensive and attacking phases. This formation suits players who enjoy intricate movements, quick passing, and positional interchanges.
- 4-3-3 Flat: offers a balanced midfield and wide attacking threats. The three central midfielders provide stability and control the middle of the pitch, while the wingers push forward to deliver crosses and cut inside to create goal-scoring opportunities. The lone striker acts as the focal point of the attack, providing a target for crosses and through balls. This formation is suitable for players who seek a combination of midfield control and wide attacking play.
- 4-3-3 Holding: emphasizes defensive stability and controlled possession. The three central midfielders work together to dominate the midfield and facilitate ball circulation. The wingers provide width and defensive cover, while the lone striker leads the line, holding up play and involving the midfielders in the attack. This formation is ideal for players who prioritize ball control, patient build-up, and a solid defensive structure.
4-3-2-1 (The Christmas Tree Formation)
The 4-3-2-1 formation, also known as the Christmas Tree formation, offers a compact midfield and a single striker up front. The two attacking midfielders provide creative support to the lone striker, while the three central midfielders control the tempo and dictate play. This formation is perfect for teams that excel in quick passing, intricate movements, and positional interchange.
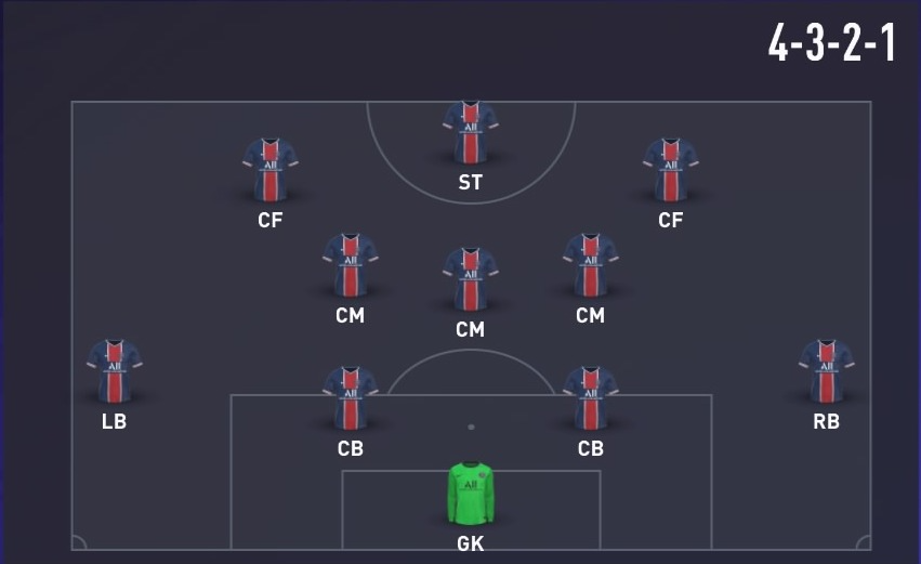
Best 4-3-2-1 Custom Tactics:
Player Instructions
- Central Defensive Midfielders: Stay back while attacking
- Central Attacking Midfielder: Stay forward
- Wide Attacking Midfielders: Come back on defense, stay wide
- Striker: Stay forward, get in behind the lines
Defense:
- Defensive Width: 65
- Defensive Depth: 50
- Defensive style: Balanced
- Depth: 4 or 5 bars (slightly deeper defensive line)
- Width: 4 or 5 bars (maintain compactness)
Offense:
- Offensive Width: 50
- Offensive Depth: 55
- Build up: Balanced or Fast build-up (depending on your preference)
- Chance creation: Direct Passing
- Width: 5 or 6 bars (provide width for attacking play)
- Players inside the box: 4 or 5 bars (increase attacking presence)
- Corners: Default or on Balanced
- Free kicks: Default or on Balanced
4-3-1-2 Variation:
4-3-1-2: features a solid midfield triangle and a striking partnership upfront. The three central midfielders control the midfield, offering both defensive cover and attacking support. The attacking midfielder operates in the hole, linking up with the two strikers and creating goal-scoring opportunities. This formation suits players who value midfield dominance and seek a compact attacking structure.
4-1-2-1-2 Narrow (Counter Attack)
Arguably one of the most meta formations in the game 4-1-2-1-2 Narrow is known for its compact defense and quick combination play. With a lone defensive midfielder shielding the defense, two central midfielders control the midfield and provide passing options. The attacking midfielder operates in the hole, linking up with the two strikers to create scoring opportunities. This formation suits players who prefer short, intricate passes and quick one-twos to break down stubborn defenses.
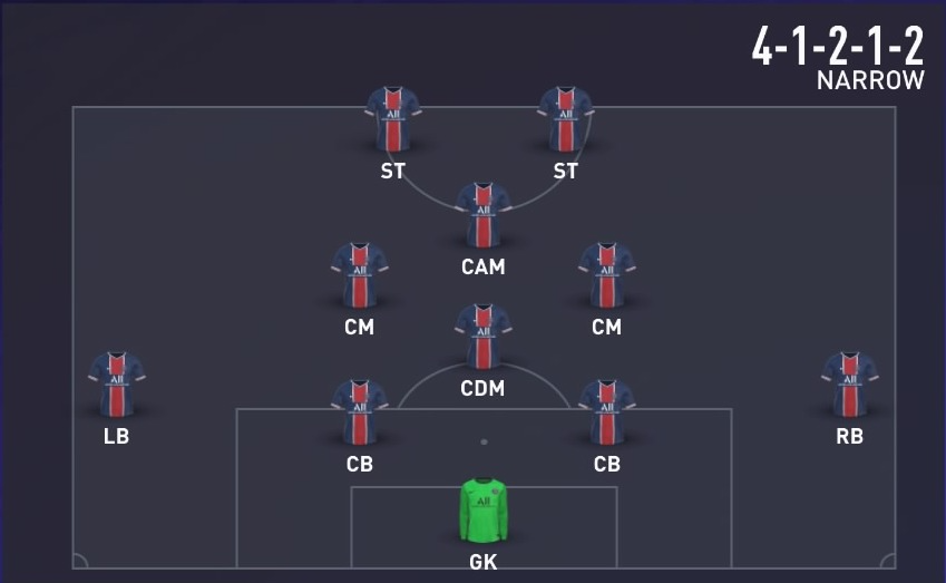
Best 4-1-2-1-2 Custom Tactics
- Defensive Style: Balanced
- Defensive Width: 65
- Defensive Depth: 50
- Offensive Build Up Play: Balanced
- Offensive Chance Creation: Direct Passing
- Offensive Width: 65
- Players Inside the box: 4
- Corners: 3
- Free Kicks: 2
4-1-2-1-2 Wide Variation
The 4-1-2-1-2 Wide formation is tailor-made for players who seek balance on the pitch. It allows you to exploit the width of the field while maintaining a strong central presence. This versatility will keep your opponents guessing and give you multiple avenues to launch attacks. So, if you're a tactically astute player who craves a formation that combines width, midfield dominance, and a potent attacking force, the 4-1-2-1-2 Wide is your golden ticket. Strap on your virtual boots, step onto the digital pitch, and let the fireworks begin as you unleash the power of this formidable formation.
4-2-4 (The Kitchen Sink)
If you're willing to take risks and go all-in on offense, the 4-2-4 formation is your weapon of choice. With four forwards pushing forward aggressively, it puts immense pressure on the opposition's defense. The two central midfielders act as a shield and provide support when necessary. This formation is perfect for teams that prioritize scoring goals over defensive stability. Prepare to score lots of goals but also concede lots of goals if you plan on running this formation.
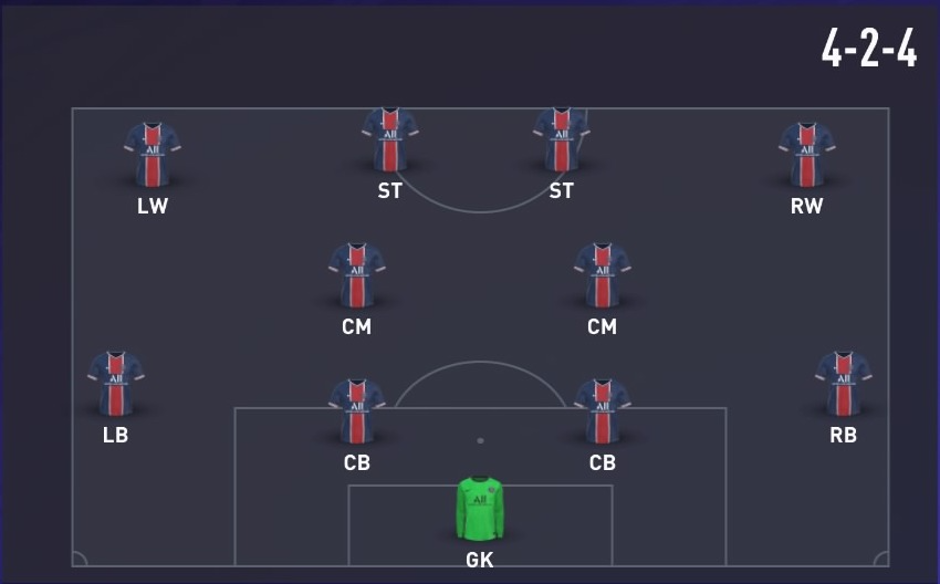
Best 4-2-4 Custom Tactics
Player instructions for 4-2-4:
- Both Strikers: Stay forward, get in behind
- Wide Midfielders: Stay forward, get in behind
- Central Midfielders: Balanced support
- Full-backs: Balanced
- Center-backs: Default or join the attack if you want a more offensive approach
Defense:
- Defensive style: Press after possession loss or constant pressure
- Depth: 3 or 4 bars (higher defensive line)
- Width: 5 bars (narrow defensive shape)
Offense:
- Build up: Fast build up
- Chance creation: Free Form
- Width: 7 bars (spread out the attack and utilize wide areas)
- Players within the box: 7 or 8 bars (increase attacking presence)
- Corners: 3 bars (send more players into the box for set pieces)
- Free kicks: 3 bars (send more players into the box for set pieces)
4-5-1
For those who prefer a defensive approach, the 4-5-1 formation offers stability and compactness. With five midfielders providing defensive cover, it can be difficult for opponents to find space to exploit. The lone striker acts as a target for counter-attacks, making this formation effective for defensive-minded teams.
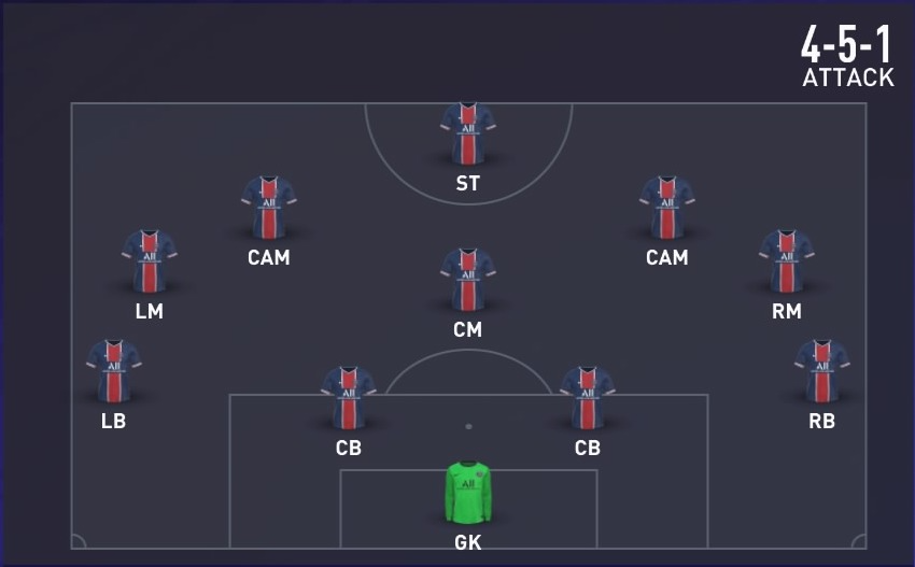
4-5-1 Best Custom Tactics:
Defensive Tactics:
- Defensive Style: Balanced
- Defensive Width: 4 or 5 bars (to maintain compactness)
- Pressure on Heavy Touch: 4 or 5 bars (to apply moderate pressure)
- Depth: 4 or 5 bars (to maintain a balanced defensive line)
Offensive Tactics:
- Offensive Style: Balanced
- Width: 5 or 6 bars (to provide width and stretch the opposition)
- Players in the Box: 3 or 4 bars (since there is only one striker)
- Corners and Free Kicks: 3 or 4 bars (to position players for set-piece opportunities)
Player Instructions:
- Striker: Target Man (to hold up the ball and bring others into play)
- Wide Midfielders: Come Back on Defense, Balanced Attack (to provide defensive cover and contribute to the attack)
- Central Midfielders: Balanced Attack, Cover Center (to maintain midfield presence and support both defense and attack)
- Full-backs: Balanced Attack, Overlap (to provide width and join the attack when possible)
- Center-backs: Stay Back While Attacking, Balanced Width
4-5-1 Variations
4-5-1 Attack: Offers attacking midfield support and a solid defensive shape. The five midfielders provide a compact and balanced structure, with the attacking midfielders pushing forward to support the lone striker. The midfielders contribute to both defensive duties and attacking movements. This formation is suitable for players who value a strong defensive shape, effective pressing, and midfielders who can create and score goals.
5-2-3 (Park the Bus)
When defense is your top priority, the 5-2-3 formation becomes your best friend. Let us tell you why Park the Bus is a popular tactic in football. With five defenders forming a rock-solid defensive line, it's incredibly difficult for opponents to break through. The three midfielders act as a bridge between defense and attack, providing support to the two strikers. While this formation may lack a bit in attacking flair, it's a fortress that can frustrate opponents. Yes, my friend, deploying the 5-2-3 formation online is a masterstroke that will push your opponents to the brink of insanity. You'll become the bane of their digital existence, a virtual villain who thrives on their fury. Brace yourself for an onslaught of furious messages, accusations of cheating, and pleas for you to "play fair." if you dare to embrace the dark side of FIFA tactics, prepare to revel in the chaos you'll create. Embrace the madness, savor the online rage, and bask in the knowledge that you've successfully riled up your opponents with the most defensive formation in the game.
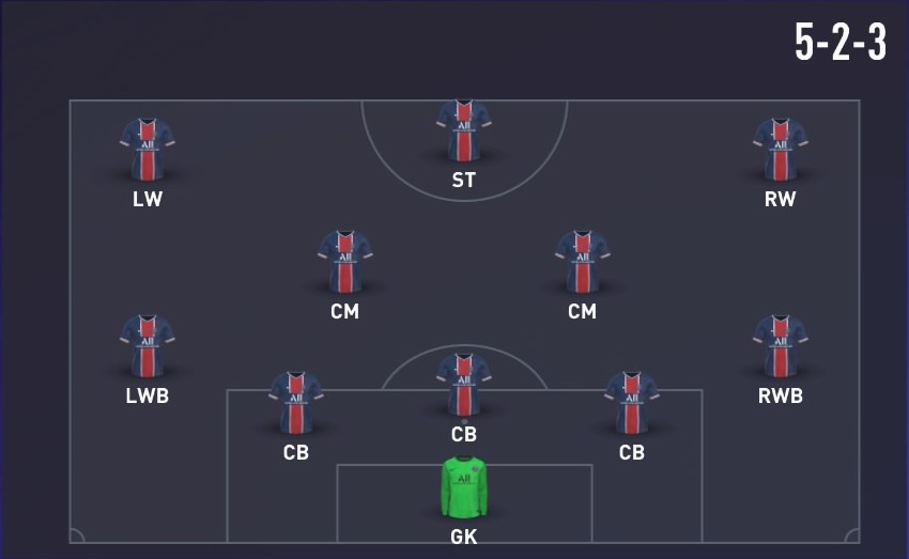
5-2-3 Best Custom Tactics
Defensive Style:
- Pressure on Heavy Touch: Apply aggressive pressure on the opponent when they take heavy touches, aiming to force turnovers and regain possession quickly.
- Width: Set the defensive width to narrow, ensuring your three center-backs and two wing-backs stay close together to form a compact defensive block.
- Depth: Adjust the depth based on your preference and the opponent's playing style. A slightly deeper defensive line can help counter fast opponents, while a higher line can compress the play and reduce the opponent's space.
Offensive Style:
- Balanced or Fast Build-Up: Choose between balanced build-up or fast build-up depending on your preferred style of play. Balanced build-up allows for more controlled possession play, while fast build-up focuses on quick attacking transitions.
- Width: Set the offensive width to default or slightly wider to stretch the opposition's defense and create space for your wing-backs and wide forwards to exploit.
- Players in the Box: Increase the number of players in the box to maximize attacking options during crosses and cutbacks from your wing-backs and wide forwards.
Player Instructions:
- Wing-backs: Instruct your wing-backs to join the attack, providing width and overlapping options down the flanks. However, be mindful of their defensive responsibilities and ensure they track back when needed.
- Central Midfielders: Set one central midfielder as a stay back while attacking to provide defensive cover and support the defense, while the other can be given more attacking freedom to contribute to the build-up and join the attack.
- Wide Forwards: Instruct your wide forwards to cut inside and get into the box for scoring opportunities. This will allow them to make runs centrally and be in a position to finish chances.
- Striker: Consider setting your striker as a target man to hold up play, bring others into the attack, and create scoring opportunities.
5-2-3 Variations
- 5-2-1-2: utilizes a three-center-back system and overlapping wing-backs. The two central midfielders control the midfield, while the wing-backs provide width in attack and defensive cover in defense. The two strikers operate as a partnership, aiming to exploit spaces and create goal-scoring opportunities. This formation suits players who appreciate a strong defensive foundation, wide attacking options, and overlapping runs from wing-backs.
- 5-2-3: emphasizes defensive stability and wide attacking threats. The three central defenders provide a solid defensive base, while the wing-backs offer width and offensive support. The two central midfielders provide a balance between defensive cover and ball distribution. The three forwards focus on stretching the opposition's defense and creating goal-scoring opportunities. This formation is ideal for players who prioritize defensive solidity, wide attacking play, and quick transitions.
- 5-4-1 Diamond: similar to the 5-3-2 formation, the 5-4-1 focuses on defensive solidity. With five defenders forming a deep line, it's difficult for opponents to find gaps. The four midfielders provide support in both defensive and offensive phases, while the lone striker acts as a target for counter-attacks. This formation is ideal for teams looking to frustrate opponents and hit them on the break.
Honorable Mentions:
4-4-1-1
In this formation, a lone striker is supported by an attacking midfielder playing just behind. The four midfielders provide width and support both defensively and offensively. This formation is well-suited for teams that prioritize control and possession, as it allows for quick passing and intelligent movement.
4-1-3-2
One of the best formations at the moment the 4-1-3-2 formation offers defensive stability and potent counter-attacking potential. The lone defensive midfielder provides cover for the defense, while the three central midfielders contribute both defensively and offensively. With two strikers upfront, quick transitions and lethal counter-attacks become the hallmark of this formation. Utilize this setup to stifle opponents and strike decisively on the break.
4-1-4-1
A good formation in certain sticky situations the 4-1-4-1 formation emphasizes a solid defensive structure and midfield control. With one holding midfielder shielding the backline, the four midfielders provide a balance between attacking support and defensive cover. The lone striker acts as the focal point of the attack, holding up play and involving the midfielders in the buildup. This formation is ideal for players who prioritize defensive solidity and midfield dominance.
4-2-2-2
The 4-2-2-2 formation boasts a balanced midfield and a dual striker threat. The two central midfielders work in tandem to control the middle of the pitch, while the two attacking midfielders support the strikers and contribute to both goalscoring and playmaking. This formation offers versatility in attack and stability in midfield, catering to players who prefer a well-rounded approach.
Mastering the intricacies of FIFA 23 formations can give you a strategic edge. Experiment with different setups, adapt to your opponents' playstyles and fine-tune your tactics to achieve success on the virtual pitch. Remember, understanding your players' roles within the chosen formation is crucial for success. With this comprehensive guide, you now possess the knowledge to unlock the full potential of FIFA 23 formations. So, step onto the pitch, implement your tactics, and experience the joy of victory in the world of FIFA.


About the author
Alex Cabal
I'm a gambler who loves betting on just about everything, from soccer, esports, roulette, tennis and even slap contests. If you can bet on it, you can be sure that I've taken a chance on it.